Quick guide: Edit profile page
Overview
Your profile page is managed through the easyWeb standard website content management system. Your site admin can unlock you after your first login attempt so that you can edit your own page. There are automatically generated/imported elements that you cannot edit, as well as freely configurable content elements and subpages.
This guide is designed to give you a quick overview and introduction to the profile page editing process.
Content
- General
- Not editable elements
- Further editing of the profile page


In order to edit your own profile page, you need to get access to the backend i.e. the configuration environment of your website. Afteryou have logged in to the backend with your unibas account for the first time, your site admin can unlock you.
To do this, navigate to the website of your organizational unit in the browser and type "typo3" after the root address of your website in the URL bar.
Example:"https://mein-institut.unibas.ch/de/home" becomes"https://mein-institut.unibas.ch/typo3".
On the page that appears, log in using your Unibas account (AAI). In the next step, confirm the data request from AAI and then the authorization from OAuth.
After a successful initial registration, you will be asked if your account has been activated. Contact your respective site admin to ask him or her to activate it. After your site admin has confirmed that you have been activated, you can click the orange "Login with AAI / Oauth2" button.
You will now be taken to the backend.
Here you can also find a tutorial video about the login and the backend.


The backend is the central management console for the contents of your profile page.
The module menu on the left allows you to select several functions. By default, the Page module is selected, which is sufficient for most tasks. View allows you to create a view from the frontend; Trash gives you the ability to restore deleted pages; the File List module allows you to manage media, attachments, and files (please note, however, that only some specific file types may be uploaded).
The User Account Control allows you to log out or change your language settings for the backend. You cannot adjust any profile information there!
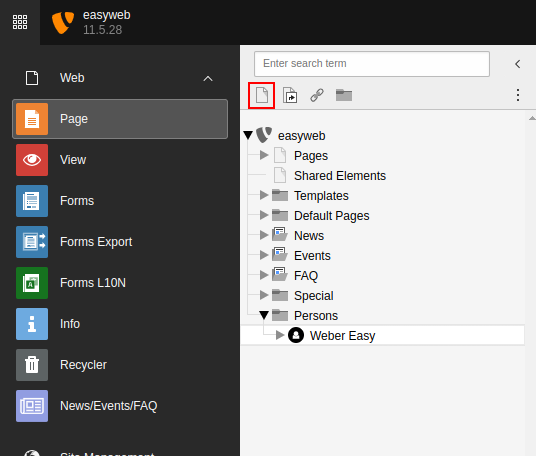
If the module Page is selected, the so-called page tree appears to the right of the module bar. Here you can use the context menu (right click) to show and hide individual sub-pages, create new pages, and use copy/paste/delete functions. With a left click you can select a specific page in the page tree for editing. Watch a video tutorial on the page tree here.
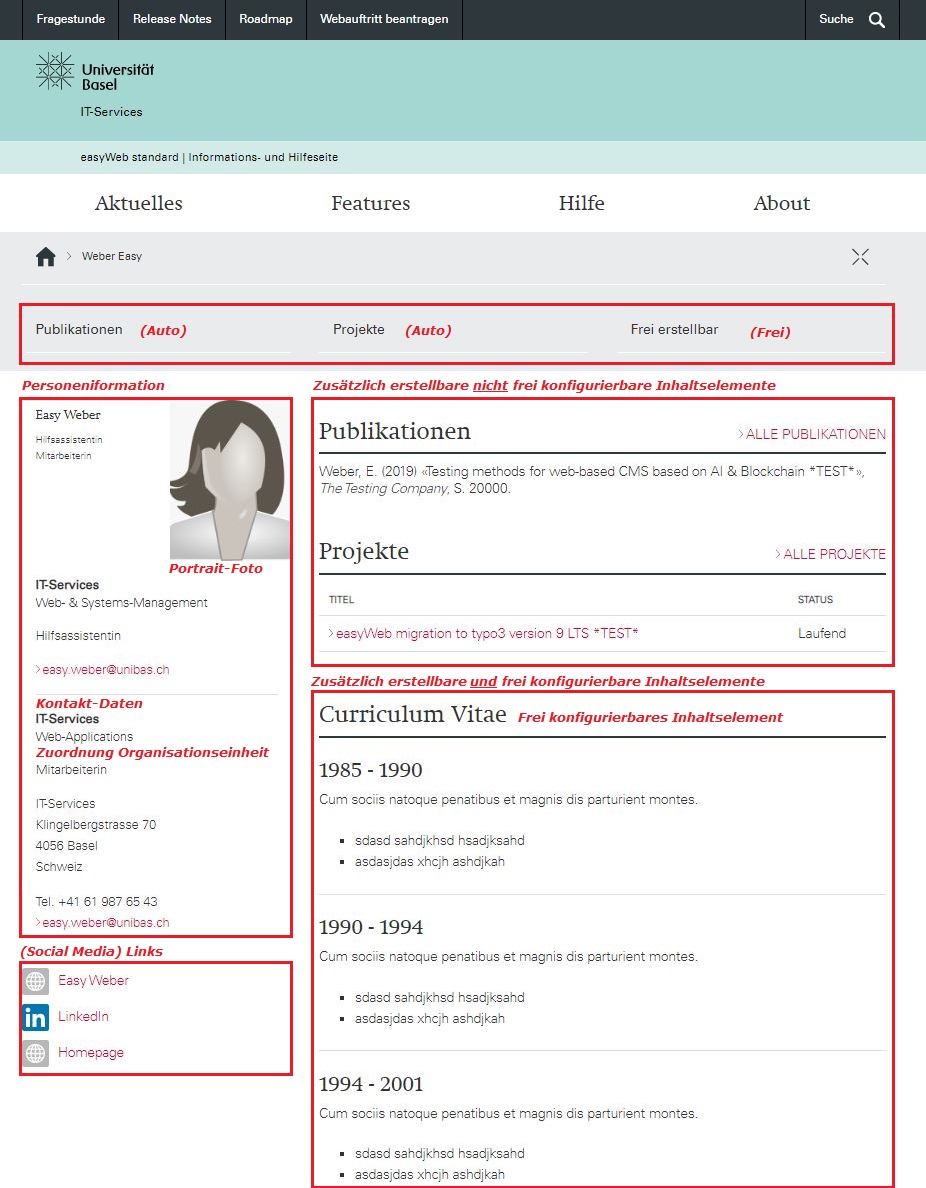
To the right of the page tree, the content elements of the selected page are listed. The Person Info block is the only content element you cannot edit, as it is fed by data from the IAM (Identity & Access Management).
If you want to add additional content to your profile page, click [+ Content] below the Person Info block. Do not add content above the Person Info block, as it may cause layout issues in future design adjustments.
You can view the page while you are working on it and it is not yet public. To do this, use the"View" icon (small eye with list). Another browser tab will open and the page will be displayed.
Here you can find many more useful videos explaining how the backend works. Please note that some functions are not used or are used in a modified form due to adaptations of the easyWeb standard interface.
Elements that cannot be edited
Some elements of the profile page are obtained from various internal university data sources and displayed automatically. This data can therefore not be edited via the profile page. In this section, you will learn where you can trigger a change of the respective information, e.g. via the managing director (IAM-GF-GUI) or the research database.

The data of the Personal Information block , the portrait photo, office hours & notes, social media links and the assignments to the organizational units come from the IAM-GF-GUI and are automatically displayed in the content element.
Your managing directors can edit this data from the internal Uninetz. You can find the person responsible for your department in the organization finder.
Note: Please contact your managing directors if you have not yet stored an official portrait photo.

Your publications and projects are imported from the research database. There you can log in with your unibas login to make changes to the publications and projects yourself.
You can, with the automatically created content elements, display the publications and projects on the profile page by enabling the corresponding content element in the backend (Make visible). In doing so, the publications and projects you have selected will be displayed in the frontend (see publication lists or project lists).
Note: Please do not delete the subpages "Publications" and "Projects" in the page tree if you want to replace or remove them completely, but hide them by right-clicking > "Disable".
The content elements in the right column (see image) serve as templates. Thus you can see some possibilities to design your personal profile page. Content elements for CV, publications, projects,links and others are automatically created and hidden as free-use content elements. You can activate them and fill them with your information.
Content element for free text and/or media: To create free text and/or media content, use the [+ Content] function in the right column of the grid element. Then select the function "Text and media".
Here you will find an explanatory video for the content element "Text and Media" as well as an instruction.
Save your changes using the "Save" function in the header and close the content element by clicking on "X" next to the Save button.
More information about the content elements can be found here.
Click on the "Create new pages" icon above the page tree and select the left "Standard" from those that appeared. Via drag-and-drop you can drag this element into your person folder. By default, the first two sub-pages are "Publications" and "Projects".
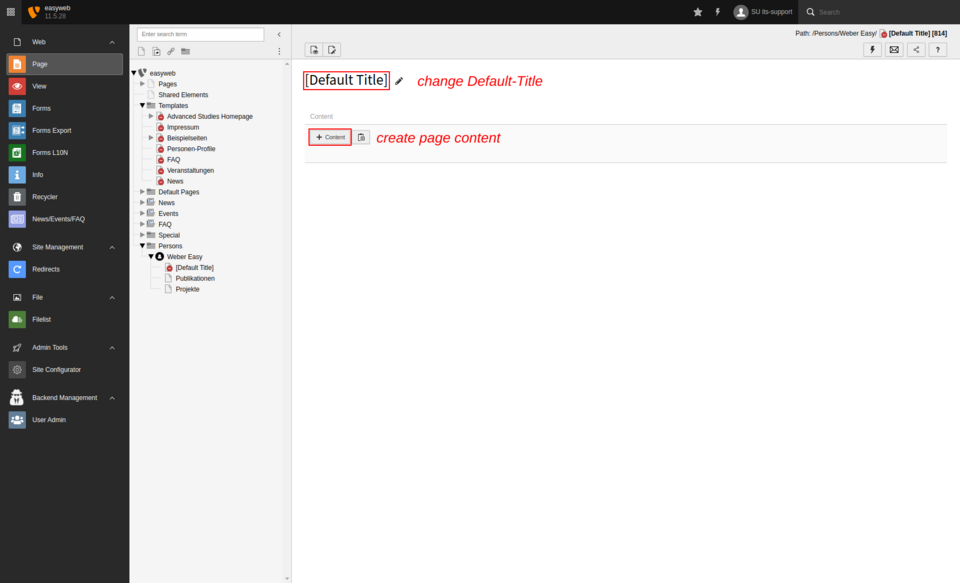
Replace the [Default title] with a meaningful title. Use the [+ Content] button to fill the page with content. It is recommended that a "grid element" is inserted as the basic structure and then the content in the grid element. You can find more help on this under Help / Instructions.
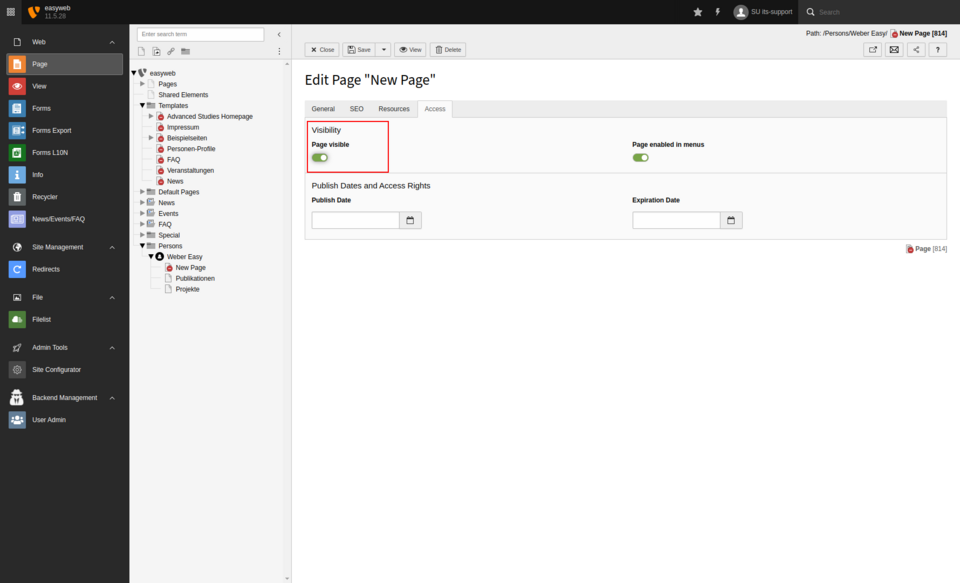
Once the page has the desired content, you can activate the page under "Access". This makes the page visible in the frontend. A subpage can be inserted in the same way as a normal page and then dragged to the correct location. Alternatively, you can activate the page by right-clicking in the page tree.
Pages
The following videos illustrate how to work with new pages:
Page propertiesThe video explains additional features that are disabled in easyWeb: Alternative page titles / navigation titles, access rights for user groups.
Content elements
You find detailed intsructions on content elements here. In addition have a look at these videos to get more detailed information about editing content elements.
General input fields in content elementsInstead of all content elements, only news and events can be categorized on easyWeb.
The content element "Text & Media
The content element "SeparatorCSS customization is not possible on easyWeb.
Crop images in content elements
Edit, hide and move content elements
Copy or move content elements to other pagesThe list module is not available on easyWeb.
Publish pages and content elements on a scheduled basis
Restore deleted elements from the recycle bin
Upload and manage filesThe video explains many additional metadata fields of files that are not necessary in easyWeb.