Person profile
In easyWeb standard, you have the option of displaying profile pages of persons. These pages can be created automatically and fed with data. The automatically created profile pages are located in the page tree in the Persons folder. This folder can only be seen by people in the Site Admin or Person Editor group. For new instances, the folder is empty by default.
A list of persons can be used to list persons. The lists can be filtered and sorted. There are other display options available.
The profile page is automatically generated according to the template when a person is clicked on for the first time in a person list. After that, the page from the Persons folder is displayed in each case. This page can be modified. Subpages can be created. You can find more detailed instructions about the profile page template here.
Content
Create list of persons
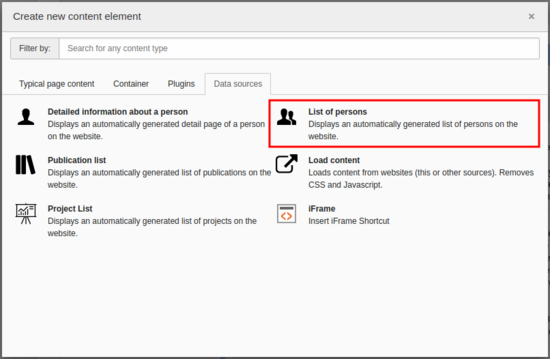
Create a new content element on the desired page. In the Data Sources tab, select the List ofpersons content element to place a list of persons.
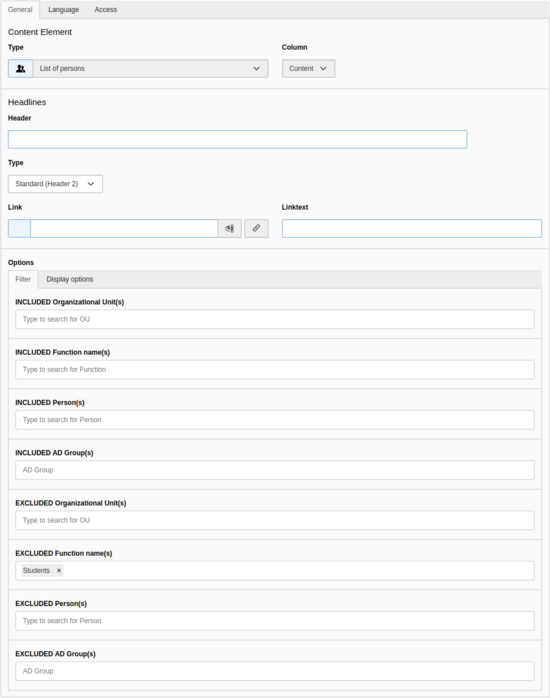
In the tab General you have the possibility to define which persons should be listed in the list of persons. The two INCLUDED fields for organizational unit(s) and function name( s) must be set at the same time, while the INCLUDED person(s ) can also stand alone. Note that an OUTPUT field always has precedence over an INPUT field.
- INCLUDED Organizational Unit(s): Select one or more organizational units. All persons in these organizational units will be displayed in the list. (Except Function name(s) field is set).
- INCLUDED Function name(s): select one or more function names. Only people with one of these functions will appear in the list. (Please note that the Organizational Unit(s) field must also be set).
- INCLUDED Person(s): Create a list of individual persons or add individual persons (that does not belong to the selection of persons set by the Organizational Unit(s) and Function name(s) fields).
- INCLUDED AD group(s): Here you can filter by specific AD groups (active directory groups).
- EXCLUDED organizational unit(s): Exclude one or more organizational units from the listing.
- EXCLUDED function name(s): Select one or more function names which should not be included in the list.
- EXCLUDED person(s): Filter out specific people on the list.
- EXCLUDED AD Group(s): Allows you to select which specific AD groups (active directory groups) should not be included.
The fields listed are search fields. As soon as you enter a term (organizational unit / function / name / group), a dropdown appears with the found organizational units / functions / persons / groups, from which you can then select the one you want.
Display options of the list of persons
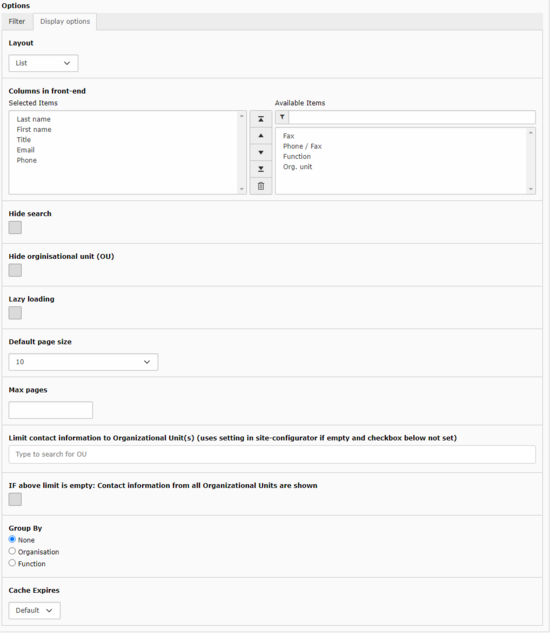
If you want to customize the display of your people list in the frontend, select the DisplayOptions tab in the Options section.
- Layout: The list of people can be displayed in 3 ways using the Layout field. The List option displays the list in table format (name, title, email, phone number) and the Cards option displays the list in business card format (title, name, functions, photo, email, phone number). The Teaser boxes option displays the name, function and profile picture in a tile.
- Columns to display (only for lists): Specify here which columns to display in your list of people. All elements on the left side are shown, those on the right side are hidden. Use the arrows to define the order of the elements. To remove an element click the Delete button (trash can).
Number of columns for teaser boxes (only for teaser boxes): Set how many tiles should be displayed next to each other. You can choose between 1,2,3,4, and Auto. With Auto, the tiles adjust to the size of the browser window.
Hide search box: Hide the search bar at the top of the list (especially useful for short lists).
Hide organizational unit: Hide the information about organizational units.
- Lazy loading: You can set that the information in the frontend is loaded only when you are visible. This shortens the first loading of the page. The reload time of the information is normally marginal.
- Default number of items per page: Specify the number of items to be displayed simultaneously on a page.
- Max pages: Configure the maximum number of pages to be displayed. You must be careful that this value is not too small. Otherwise, not all persons may be displayed.
- Restrict contact information to organizational unit(s): It may happen that a person has contact information assigned to several organizational units (e.g. if employed in 2 different departments). The field Restriction of contact information to organizational unit(s ) can be used to restrict this. To do this, specify the desired organizational units for which you want contact information to be displayed.
- If above restriction is empty: contact information of all organizational units will be displayed: A default can be set for this field in the Site Configurator module, which will be applied if the Restrict contact information to organizational unit(s) field is empty. If the global default is set, but you want to display the list without filtering, you can check If above restriction is empty: contact information of all organizational units will be displayed. This will override the global default, even though no value is set in Restrict contact information to organizational unit(s).
- Group by: Group Entries. It is possible to group by organization or function. By default, this option is disabled (None).
Example list of persons
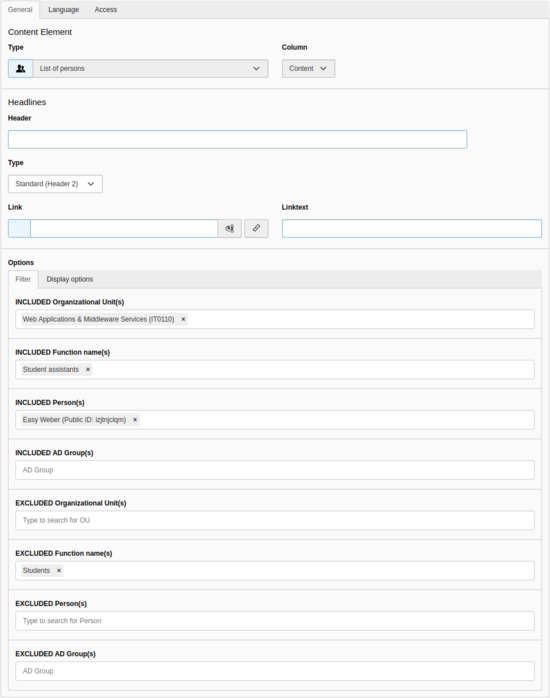
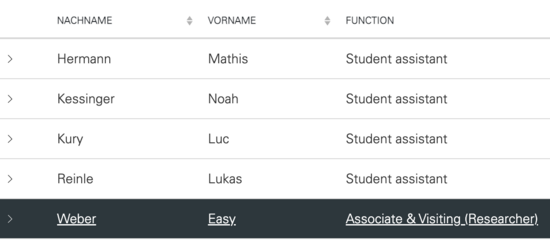
In this example, the list of people is restricted to people who are in the "Web Applications & Middleware Services" organizational unit and have the "Student Assistants" function . Additionally, the person "Easy Weber" is added to the list and the function "Students" is excluded. The layout chosen is "List".
Create profile page
You want to create a profile page for a person?
Create a person list (as described above) that contains the person. Then open the person list in the frontend and click on the first or last name of the desired person to call up the profile page. You will be automatically redirected to the newly created profile page. This usually takes longer than loading a page normally.
Once the profile page has been accessed, the profile page will also appear in the backend in the page tree - in the Persons folder. Your profile page is also displayed at the top of the page tree, so you don't have to search for your page.
Each profile page has a link to the publications and projects in theresearch database. Lecturers also have a link to the course catalog. Further links and subpages can be created. A detailed description of the procedure can be found in the article Edit profile page.
It is possible to use the profile page you have just created on several easyWeb instances (e.g. display a profile created on https://germanistik.philhist.unibas.ch/de/fachbereich/personen/ again at https://philhist.unibas.ch ). To do this, you must generate a personal profile link via IDM. To do this, contact your managing director or write an email to support-its@unibas.ch. This link will then be displayed in all further lists of persons instead of generating a new profile page. This way you only have to maintain your profile page in one place.
Delete profile
Profile pages can be deleted manually. In addition, the pages are regularly cleaned and automatically deleted by the system.
Manual deletion
Select the Pages module. In the Pages tree, select the name of the person in the People folder. Now you can delete this page, just like a normal page. Make sure that you have enabled recursive deletion if the profile has sub-pages. Otherwise you will have to delete each page individually.
If you delete a profile manually and the profile is reactivated or generated later, a new profile page will be generated and any changes in layout or content will be lost.
Automated deletion
Sometimes profiles remain even though the person is no longer associated with the respective instance (i.e. they do not appear in any person list). In easyWeb standard, such profiles are automatically deleted since release 3.2.1. Only persons who can be found on the following page can create a profile page on an easyWeb instance: https://personensuche.unibas.ch/. If it is about data of the person itself, you can find more information here. Note that this page is only accessible to university employees.
Note: As soon as an automatically deleted person reappears in a list, the old profile is restored and no new profile page is generated.
First, contact your responsible managing director. This person can maintain personal data in the SAP system. If you have more complex questions, you can contact the Identity and Access Management (IAM) via the support desk. The IAM manages people and their authorizations for university-wide access to IT resources. It forms the hub for the exchange of personal data between the various IT systems.
"Identity management" (IdM) in a company often interfaces with access management (e.g. SWITCH edu-ID), which, for example, manages access rights for portals, enables single sign-on (SSO) or manages security policies. The term "Identity and Access Management" (IAM or IdM) has therefore now been coined in information technology (IT) for the combination of identity management and access management. Source
IdM is managed by the IAM team from ITS and receives its data from Human Resources (HCM & SLCM), among others. Executive or authorized individuals can use the GF-GUI, the web-based user interface, to make certain changes to personal and/or organizational data in the IdM. These changes can have an impact on the displayed personal data in easyWeb, among other things.
The manual for the IAM GF-GUI can be requested from the ServiceDesk (support-its@clutterunibas.ch).
There can be different reasons why a person is not displayed in a list:
- Filter in person list wrong
- Info of the person wrong (OU, function, etc.)
- Display block deactivated
- §3 person
The display block is deactivated by default forparagraph 3 persons. This prevents easyWeb from displaying the person. If you want a §3 person to be displayed, proceed as follows.
Check the following:
- Can you find the person in the person search/person info?
- If yes-> the problem is most likely with easyWeb or the configuration of the person module/site configurator.
- If no -> the problem is most likely that the person's display block is set to inactive in the IAM GF GUI. To fix this, report this to your management or HR representative so that they can activate the display block, after which the §3 person should be displayed in the person search and on your instance.
Further link: Instruction for the administration of personal access authorizations to uiniversity IT resources.
This can be done with the filter field "Limit contact information to Organizational Unit(s)" in the "List of persons" element. If a value is set there, only the contact information of the corresponding organizational unit will be shown. The site admin can globally set a default for this field, so even if the field is not set in the element, a filter will still be applied. You can override this default by checking "If above limit is empty: Contact information from all Organizational Units are shown".
If the above options do not work, it is possible that the cause of the error is in the GF-GUI (IDM). Possibly blocks with a "crossed out eye" are hidden there, or a filled in free text field overwrites the database connection.
If you are unsure, ask a site admin of your website.


