Manage News and Events
This section shows you how to create new posts for News and Events in the backend of easyWeb, how to provide them with categories and tags, as well as the various settings that are available to you for the design. For the FAQ function from the same module, you will find separate instructions here.
In order for News and Events to be displayed, two steps need to be followed:
- Configure news (or event) post
- Enter content of the News / Event
- Filter post with tags and categories
- Place output plugin on the page
Since this tutorial can be used for News and Events posts, we refer to each as a post. If necessary, a distinction is made.
Content
Create news and event post

News module, select News folder and show or hide filters

Context menu News
Manage News and Events
To create a new News or Event post or edit an existing post, select the News/Events/FAQ module on the left (purple newspaper icon) and the News or Events folder in the page tree. Now you will see all the posts you have created so far below a filter area. If a News post appears in the listing with a minus icon, it means that the post is hidden. A clock icon means that the display of the post in the frontend is limited in time. You can show and hide the filter area with Show/Hide Filter.
Filter area for the folders "News" and "Events"
| Function | Description |
|---|---|
| Search | Full text search in all News or Events posts |
| Time Range | Date and time specification in two fields (From and To), which displays only posts of a certain time range |
| Top News | Filters according to whether the "Top News" flag has been set to fix a post |
| Hidden | Shows only posts that are invisible or visible |
| Archive | Shows either only active or only archived posts |
| Sort by | Allows to sort the results (e.g. by title, author or date) and whether to sort ascending or descending (Ascending/Descending) |
| Recursive | Allows numerical filtering by nesting depth (number of subfolders) |
| Category selector | The larger area on the right allows filtering by specific categories by setting check marks |
| Category mode | Allows to apply logic operators to the selected categories. For example, if you want to display only Events that are categorized as "Doctorate" and "Continuing Education" at the same time, you would have to select "AND". The checkmark "Including subcategories" has no effect. |
Context menu
If you right-click on the icon (leftmost in the row) of a post in the list of posts, the context menu opens, which allows you to create, modify, delete, etc. posts.

Create new news post

General tab

Options tab

Relations tab
To create a new News item, click the Create new news record icon at the top of the screen. When you do this, you should be in the News Listing selection.
General tab
In the General tab you can enter the following information:
- Heading: Title of the News article.
- Speaking URL path section: Configure a so-called speaking URL (by default, the title of the News is set).
- Top News: If Top News is activated, the News will be displayed at the top of the list view. To be able to use Top News, you also have to configure the News plugin accordingly (see instructions: Activate Top News).
- Teaser: Short introduction to the News item.
- Author Name: Name of the author.
- Date & Time: Publication time of the post. By default, the date and time of the first creation of the post are taken. If the post is published a few days after it was created, it makes sense to adjust this information accordingly.
- Archive: Date when the post will be archived (see also).
- Rich text editor: Text of the News article.
Language tab
In the Language tab you can choose the language setting of the post. More information
Access tab
In the Access tab you can publish the News item and specify the time period during which a News item should be displayed. The News publication date field influences the order of News listing.
- Hide: If selected, the post will not be published (is only visible in the backend).
- Publication date: Time when the News post will be published.
- Expiration date: Time when the News item will be hidden.
Options tab
You can define categories and tags for a post and filter accordingly. Categories are predefined by WebDesk and cannot be changed.
If you want to use tags, you can either select existing ones or create and select new ones. Click the search box and search for existing tags. If the tag you want to use does not exist yet, you can click on the last item in the listing "... please click here". The tag will be created and automatically attached to the post. Follow these instructions if you want to edit the tag further.
Relations tab
In the tab Relations you can define an image for the News article under Media file. Please do not forget to enter a text required for accessible screen readers under Alternative text, title and description (caption). Under Related Files you have the possibility to link documents and under Related Links you can create a list of links. The documents and links are displayed on the detail page (see Configuring the detail view section below) of the post.
Save and close
After you have made all the desired posts and settings for the News post, complete the process by clicking Save and you can close the post. You can edit this post at any time by opening it and saving it after making the desired modifications.

More information
When creating an Event post, you proceed in the same way as when creating a News post. The only difference is that the Events are managed in the Events folder.
Create a new Event
To create a new Event, select the News/Events/FAQ module and the Events folder in the page tree. Click on the Create new news record icon at the top of the screen. Creating an Event works in the same way as creating a News post, but you can enter additional information about the Event in the General tab:
- Date & Time: Start date of the event (default time is 00:00)
- Event End:End date of the event
- Organizer Title: Title of the organizer
- Organizer:Organizer of the event
- Venue: Venue of the Event
Since the easyWeb standard release 2.1.4, you have the possibility to hide the start and end time in the frontend:
- Leave start and end time at'00:00' - no time is displayed in the frontend.
- Set end time to '00:00' - only the start time will be displayed in the frontend.
This data is then automatically offered for download as an iCal file on the detail view of the Event. This is an easy way to transfer an Event to an external calendar application.

Icon for new News tag
You can add tags to posts. This allows them to be filtered in the backend. Tags can also be used to filter posts when they are displayed on a page.
Tags can be created in two ways: 1)while creating/editing a post or 2) select Create new tag record in the News Listing view (see image). If you choose the first option, you will not be able to modify the tag until after you save the post. If you create the tag using the second option, you will directly have the possibility to enter several specifications.
You have the option that tags are displayed in the frontend - in lists and the detail view.
Tags can be managed by you and therefore you have no defaults in naming them. You can name and use them as you see fit.

Tag folder
Each newly created tag is then stored in the tags folder of the respective post type (News, Events or FAQ). This way, all tags can always be used, regardless of the editor's permissions (compare image on the right). The tags can only be used for the respective type (News, Events or FAQ). Tags created in News cannot be used for Events and vice versa.

List all tags with entry in dropdown menu

Show list of all tags in a category (News, Events or FAQ)
Existing tags can be listed in the Show all tags view. Now you also have access to tools to edit the tags. Take a look at the two images. Tags can also be translated. If translated tags are available, the available tags in the respective language are automatically listed in the Show all tags view.
Show tags in the frontend
In order for a tag to be displayed in the frontend, this must be specifically defined for each tag. In the list of all tags, select the tag to edit. Now set the option Show tag in list and detail view in the detail view of the tag. Save the change.
Now the tag is displayed in the lists and detail views if this tag is attached to a post.
Placement and output on the page
After the posts are created, they can be displayed on the website using the News/Events/FAQ content plugin. We recommend that you use a preconfigured template. This can be customized after creation.
How the plugin works
With the plugin you can define how the listing of posts should be displayed. There are several display options available to you for this. In addition, the plugin defines on which page the post should be displayed. In the templates this is already defined - the respective detail page from the Default Pages folder is used. The posts are listed where the plugin is located. On the page, which is defined as detail page, the single post - incl. separate URL - is displayed. If you now click on a post, the corresponding detail view of it will be loaded.
Also note that predefined detail pages are available. Please use these exclusively. If you want to customize the detail view, do it once. This will prevent posts from appearing more than once. If in several plugins different detail pages are defined for the same posts, accordingly several detail views are created for the same posts. This behavior is not desirable.
We recommend the following ways to include the plugin on a page:
- Copy the template: copy the entire page from the templates.
- Copy the plugin: copy the plugin and paste the content element on the desired page

Copy and paste the template page
To include a News, Event or FAQ view using a page template, proceed as follows:
- Scroll to the bottom of your page tree and expand the gray Templates subfolder by clicking the small triangle next to it.
- Right-Click on "News", "Events" or "FAQ", depending on which of these elements you want to include. Select Copy from the context menu (right-click).
- Now navigate in the page tree to the place where you want to insert the new page with the plugin. With via the context menu Paste in or Paste after you can insert the page (depending on the desired position of the new page).
- You can now assign a page title. The newly inserted page is initially still hidden. If you want to publish the page, select Activate via the context menu or the page settings.
- Now select the page via the Page module by left-clicking on it. Edit the plugin to adjust the display of the list view.

Copying the News or Event plugin

Inserting the plugin on the (new) page.
If you have already created a page with content and want to add a News, Event or FAQ listing to it, use the plugin template to do so. Proceed as follows:
- Make sure the Page module is selected.
- Scroll to the bottom of the page tree and expand the gray Templates subfolder by clicking on the small triangle next to it.
- Open the "News", "Events" or "FAQ" page, depending on which of these elements you want to include. Now you can see the plugin in the right part of the screen.
- Open the context menu by clicking on the cube icon. Then select Copy (compare image).The plugin (with all its settings) is now on the clipboard.
- In the page tree, switch to the page where you want to paste the plugin.
- Paste the plugin on the page.
- As a last step, activate the plugin via the Make visible button.

List views for News

List views for Events
There are different templates for the display of News and Events. Under What to display you have the possibility to choose between the following templates:
News List Views:
- List view (News)
- List view with image (News)
- List view with teaser box (News)
Events List Views:
- Upcoming events: Shows all future Events
- Upcoming events with picture: Shows all future Events, additionally displays a picture on the left side
- Upcoming events shortlist: Shows all future Events in short form
- Archive list view: as above, but only past Events
- Archive list view with picture: as above, but only past Events
- Archive shortlist: as above, but only past Events
Detail view (news and events):
- Detail view: a single News or Event post can be displayed.
List views can be used to automatically create RSS feeds.
Attention: Since the icons for iCal and the RSS feed are displayed at the same height as the headline of the respective plugin, no links should be placed next to the headline for News and Events.

This is how a finished News article is displayed.

Detailed view of a News article.
The News posts are managed in the News folder and displayed as a list on a page with a correspondingly configured News/Events/FAQ plugin. The detail view is reached via a page with an appropriately configured News/Events/FAQ plugin. The detail page must be specified in the plugin for the list.
The folders News, Events and FAQ, as well as corresponding example pages and the corresponding detail pages are available when the product is delivered (see also folder Templates and Default Pages).
The Templates folder contains templates that you can copy. The Default Pages folder contains the detail pages that you need for the detailed view of News, Events or FAQs.
Alternative: Manual lists
List and detail views can also be placed, configured and output manually. We do not recommend this procedure.

"Plugin" tab in "Create new content element" window.

News plugin settings
You can bypass this step if you copy a template for a News/Events/FAQ page from the Templates folder to the desired location in the page tree as described above. The detail view is already linked to a page from the Default Pages folder.
If you want to output a manually configured list of news or events on a page, you have to place a news plugin on the desired page. To place a news plugin, create a new content element on the desired page and select the News/Events/FAQ content plugin from the Plug-Ins tab. To configure the plugin, select the Plug-In tab. The following three options are mandatory to configure:
- What to display: here you can select with which template the posts should be displayed. Please note that there are different templates for news and events.
- Starting point: Here you select the folders from which the posts should be loaded. By default, the posts are located in the News, Events or FAQ folder. You can create additional subfolders below. These will not be pulled automatically. You have to assign them here.
- List of articles (News only): Here you select individual posts to be displayed at this location. For this you have to add the articles in the lower of the two lists.
- In the Additonal tab, under Page ID for Single News Display, you have to store the detail page. This will be opened when a post is clicked. You can use the respective page in the Default Pages folder for this, or configure your own detail view (next step).
Sources of error:
- It often happens that the page ID for Single News Display is forgotten. If this is not specified, the item can only be viewed in the list and not in detail.
Note: It is important that you always use the default detail views from the Default Pages when configuring a plugin. Otherwise, a search engine will find the same post several times for each detail view. As a result, the search engine will rank your website lower.
If you have copied your news or event page from the templates folder as described above, you can skip this step.
Otherwise proceed as follows:
If you want to create a detail page, you need to place a News/Event/FAQ content plugin on the desired page, analogous to the list view. Create a new page (e.g. as a subpage of the page with the news or events and name it Detail). Create a new News/Events/FAQ content element on it. In the newly created News/Event/FAQ, select the Plug-In tab. Under Display Mode select the Detail View and save the page.
Error sources
- Note that posts are not listed multiple times with different detail pages! You can prevent this by either using the default page provided exclusively or by creating a detail page once and using it exclusively.
You can find more configuration options here: Additional news and event configurations.
Selected posts in list
With news and event lists you can select entire folders on the one hand. On the other hand, you can display specifically selected posts. So you can select and display single articles from different categories and (sub-) folders. The following explains how this can be implemented.
Insert a plug-in as described above and open it for editing. In the Plug-In tab two entries have to be configured.
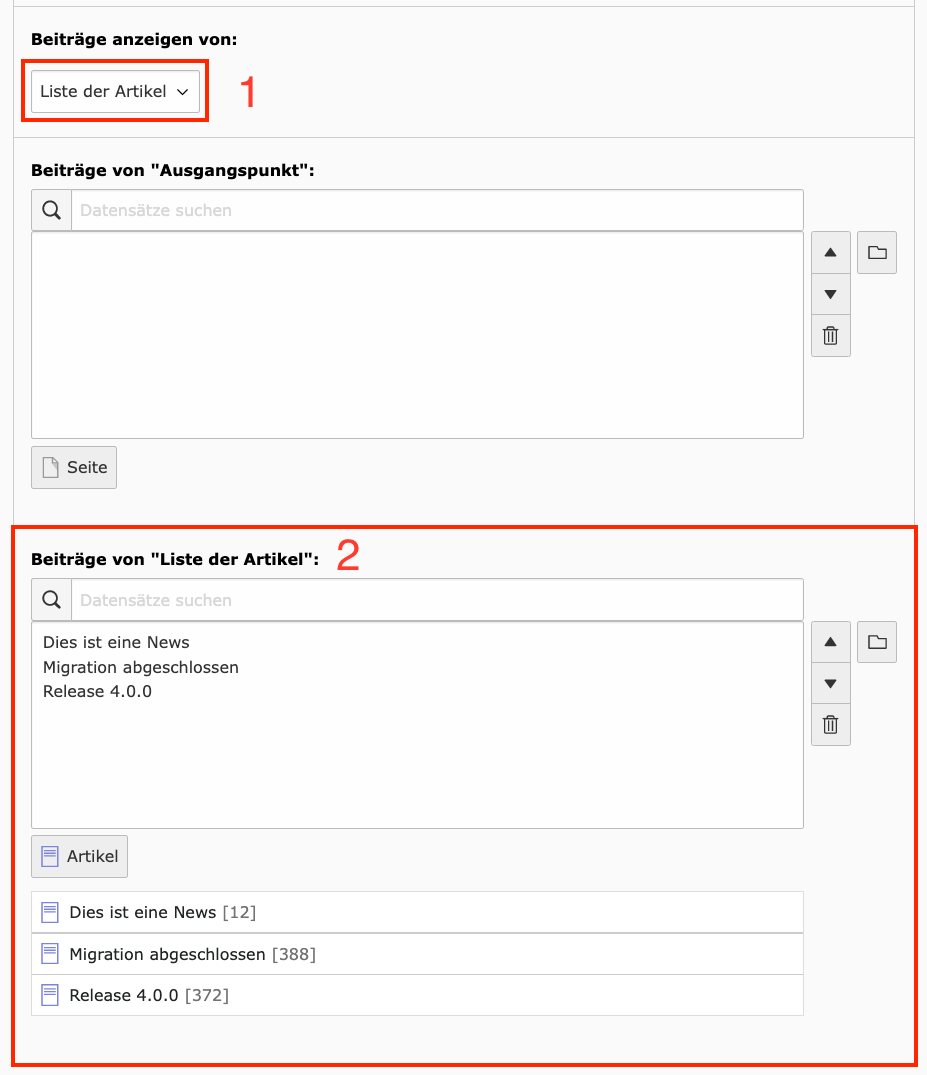
- In the field Show posts from: select the option List of articles - by default Starting point is selected.
- Now, in the List of articles field, you can select the articles to be displayed. Either by text search or by record selection search.
The order in the list is analogous to how the articles are displayed (compare picture with news list). The order can be adjusted with the arrows on the right.
After saving, the selected posts are displayed. The list is not automatically updated when a new post is created. New posts must therefore be selected manually.
In the example, three different posts were selected.