Multilingualism
Eight different languages can currently be used in easyWeb standard: German, English, Français, Italiano, Español, Chinese, Arabic and Japanese.
The desired languages must be activated once by a site admin in the Site Configurator. For each of these languages, the corresponding page must be translated manually. There is no automatic translation. Since release 3.0.2 DeepL can be used for translating the content. This allows you to quickly translate all relevant texts.
Please note that the university maintains a glossary with the correct English and German terms for terms used in everyday university life. These can be looked up at https://unibas.ch/glossar.
To translate a page, three steps are necessary:
- Activate additional language
- Create a translation of the page
- Translate the content on the page
Enable/disable additional language

Additional languages are enabled or disabled in the Site Configurator.

button to change the text flow direction from LTR to RTL.
In addition to your default language (defined during the website request), site admins can activate and deactivate the other languages of a website independently. To do this, select the Site Configurator module in the backend. There, under Additional Languages, you can see which languages are enabled and disabled (grayed out). To activate or deactivate a language, click on the corresponding button. Finally, it is important to save the changes.
Already existing translations in the respective language are shown or hidden by de-/activating the language.
Create translation of a page

The translation view in the Page module.

Translation of the page (title of the page in the new language).
If another language is activated for your website and an already created page exists in the default language, you can translate it now. Use the images as a guide.
- Select the Page module.
- In the page tree, click on the page that you want to translate.
- In the Languages view, select (1). This will show the translation view.
- In the dropdown, select the language you want the page to be translated into (2). The enabled languages are available for selection here.
- Once you have selected a language, a dialog box will appear to define the translated page. Here you must specify the title of the translated page in the new language (3).
- When the title is changed, the URL segment is automatically adjusted according to the new title (4). If you want to give the page a different URL segment than what was generated, you can do so by selecting "Toggle URL segment" .
- Then click on the Save button.
Your page is translated and you can now translate its contents.
Translate contents of a translated page
After the page has been translated, its contents must be translated into the respective language. With easyWeb standard, you can translate content in two different ways. Since release 3.0.2, content can be translated using DeepL. This functionality extends the manual translation of content. You can use the texts translated by DeepL as default texts.
Translate manually

Have grid and content elements of a translated page created.
Step 1 - Create content
In the Page module, select the Languages view for the selected page. Click the Translate button (5) for the corresponding language.
A translation dialog with 4 steps will appear, each confirmed with Next:
- Select the Translate option so that your grid and content elements are created on the translated page.
- Select the language from which the content should be copied. We recommend selecting the default language. If only one language already contains content, this step will be skipped and this language will be selected automatically.
- Now you will see an overview of which elements will be created on the translated page. Select the Next button to create the grid and content elements in the new language.
- The grid and content elements are automatically created with the original text.
Translate with DeepL

Translation dialog with option DeepL
Create content and have it translated
Select the Translate option. A translation dialog will now appear
- Select the option DeepL and Next - Translate (deepl) (autocorrect)
- You will now be asked from which translation the new one should be created. Select the default language. If no translation is enabled yet, this step will be skipped.
- Select which content elements should be translated and confirm this with Next.
- The content will be created and filled with a suggested text translated from DeepL.
The translation dialog closes automatically. It may be that the translation takes a long time. As long as the translation dialog is open, the translation is not finished.
Now you can check the translated content and adjust it if necessary. Image metadata will also be translated, if any has been created.
Important: When translating with DeepL, simple line breaks (Shift-Enter) from DeepL are removed. If you still want them in the text, you have to edit them manually in the translation.
Step 2 - Translate texts

Translate the content elements into the new language.
Now all grid and content elements are created and hidden for the page to be translated. In the translation view of the page (Languages), the translation with its translated grid and content elements is displayed next to each page in the default language. In the default view (Columns) you can choose which language you want to be currently displayed for editing by selecting the language in the dropdown list.
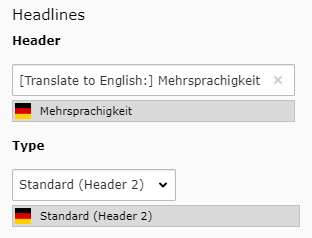
With these preparations you can translate the text into the new language. Edit the corresponding content elements and enter the text in the appropriate language. When translating, the texts are supplemented by e.g. "[Translate to English:]". This indicates that the text should be edited / translated by you. You can remove the hint after the work is done.
In order for the translated content to appear on the website, the corresponding elements must be made visible.
Do not forget to adjust fields (e.g. the hidden heading of a grid element), which are only visible in the backend. This makes it easier to distinguish and continue working with the elements.
Error sources

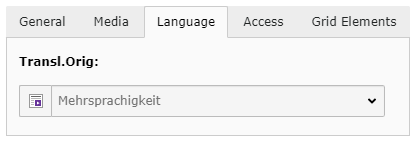
Edit Page Content > Language tab: Reference to element in default language

Edit Page Content > General Tab: Reference to Element in Standard Language
It can happen that during the translation of the content (automatic translation), references are not set correctly. This becomes apparent at the latest when you want to activate translated elements, but they are not activated.
A translated element needs a reference to the corresponding element in the default language. Check in the tab "Language" if a reference to the correct element is set (see image). If no element appears, translate the page again.
Translate image metadata globally

Translate metadata
The metadata of images (e.g. description and caption of an image) cannot be translated directly after uploading in the Page module. Accordingly, the changes would also apply only locally.
Instead, you can access your previously uploaded file via the File List module and call up the Translate Metadata function by clicking on the icon to the left of the file name (page with globe). Now select the language for which you want to create a translation. For the edit icon to be visible, the extended view must be selected. The selection for this is at the bottom of the list.
With the language selector you can create different translations for the captions and metatexts. The changes you make here apply globally to the whole instance. These translations can only be created manually. If the image is used multiple times, the data does not have to be entered multiple times.
Display same content in all languages

Display grid or content element the same in all languages
Occasionally, you may not want to translate a content element, because you want the content to be displayed the same way in all language versions. This is especially interesting for content elements with little text like sliders, contact boxes, or similar.
You can use the "All languages" function for this purpose. To do this, select [All] in the Language tab when creating a content element in the default language. An icon with several flags will appear. The element is now displayed on all language versions of a page. You cannot translate it separately. This circumstance may cause you to see more elements in the default language column than in the other languages (this behavior is intentional). The order of content elements is also derived from the default language.
If necessary, this setting can be changed again. On the page in the default language, select the default language in the content element in the Language tab.
The described instructions can also be applied to grid elements.
Update translations
The updating of translations can be divided into two types - changed content and changed structure.
If you change the content in a content element in the default language, you should also change the content for the additional languages. It is not necessary to translate the page again. Content refers to texts, images and other information that you enter in content elements. However, if you have added a lot of new text to an existing content element and want to translate it using DeepL, it is recommended that you delete the content element in the translated language and translate it again using DeepL such that the new text is also added.
Please refer to the section Special content elements for exceptions!
If you have changed the structure, the page must be translated again. Structural changes are the insertion and editing of grid and content elements. If content has been moved on the page in the default language (e.g. to another grid element), the translated content is automatically moved to the same position on the translated page. If a content element is moved to a newly created container element that has not yet been translated, the translated content element is no longer displayed. As soon as the newly created container element has been translated too, all elements that already had translations appear directly in it and are displayed again.
Content elements can only ever be created in the default language and can then be translated.
As soon as an element has been created in the default language, the Translate button is automatically displayed again on the translated page. Clicking this button synchronizes the elements, i.e. all missing elements are created on the translated page. You can now translate the texts of the newly created elements on the translated page (see section Step 2 - Translating texts).
Special content elements
There are content elements or parts of content elements which should not be created manually in a translation. This applies to all link lists. These can be found in the following content elements: Link box and Framed box. If you need to add a new link or delete one, we recommend that you proceed similarly to the section The content element was created in a grid element.
Edit the translated content element (e.g. link box), navigate to the list of content elements and create the missing links using the Synchronize with original language button. Then translate the texts of the new links (see section Step 2 - Translate texts).
Behavior of (not) translated pages

A website with 2 additional languages, in addition to the default language.
The visitor will find the website differently depending on the configuration of the translations. A page that is not translated will not be displayed in the additional language. That is why it is important to translate the corresponding pages.
As soon as an additional language is activated for the frontend, a button with the corresponding language is displayed in the meta navigation area. Here those languages are displayed which are currently NOT selected. The language buttons allow visitors to view the current page in the respective language, provided that a translation is available.
In the frontend of easyWeb standard, only pages are displayed in the navigation menu that are also available (i.e. activated in the default language and an existing translated page for the corresponding activated languages). If no translation is available, it can lead to the navigation menu being empty or incomplete for other languages.
If the visitor selects the language of a page whereno translation has been made, they will be redirected to the home page in the corresponding language.
Is the translation complete?
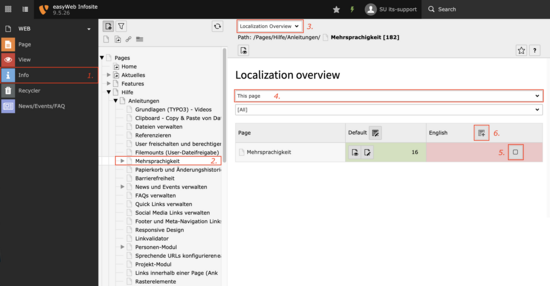
You can use the Info module to find out which of your pages has a translation and which does not.
- Select the Info module (1)
- Select the page or subsection of which you want to know if there is a translation (2)
- Select the Localization overview option (3)
- Select the depth of the query (4) and the desired languages. By default, This page and All are selected
- Now you will see if there are translations for this page/area. If yes, the page will appear green in the respective translated language. If not, the block will be displayed in red. You have the possibility to select the page for the new language (5) and create a translation (6)
Tip: You can check all translations of the instance. By selecting the Pages page in the page tree, Infinite for the depth of the query and All for the languages . This way you will get a report concerning the translations of all languages of the whole instance.


