Manage files
easyWeb standard supports the upload of external files, graphics, images, etc. which you can later reference in various content elements. The basics are explained in the TYPO3 videos here and here. In easyWeb standard there are some differences to a normal TYPO3 installation, which this manual will explain in more detail.
Please note that records in the recycle bin will be permanently deleted after 2 years.
Content
Upload
via the "Filelist" module
You can find the "Filelist" module on the left side in the module menu. When you open the "Filelist", you will be presented with the view shown in Figure 1. In the left red-marked area you can see the folder structure. For example, you can group the uploaded files by topic or subpage. With the button 2 "New" you can create a new folder if necessary. Now click on the desired folder and then on the button 1 "Upload Files". The window for selecting a local file will appear. After you have selected a file and clicked on the OK button, easyWeb standard displays the progress of the upload with a green bar. The process should not take more than a few seconds for files of common size (< 2MB). By right clicking on the icon in front of the new file, you can edit the properties of the file or move the file to another folder if necessary (link to further instructions).
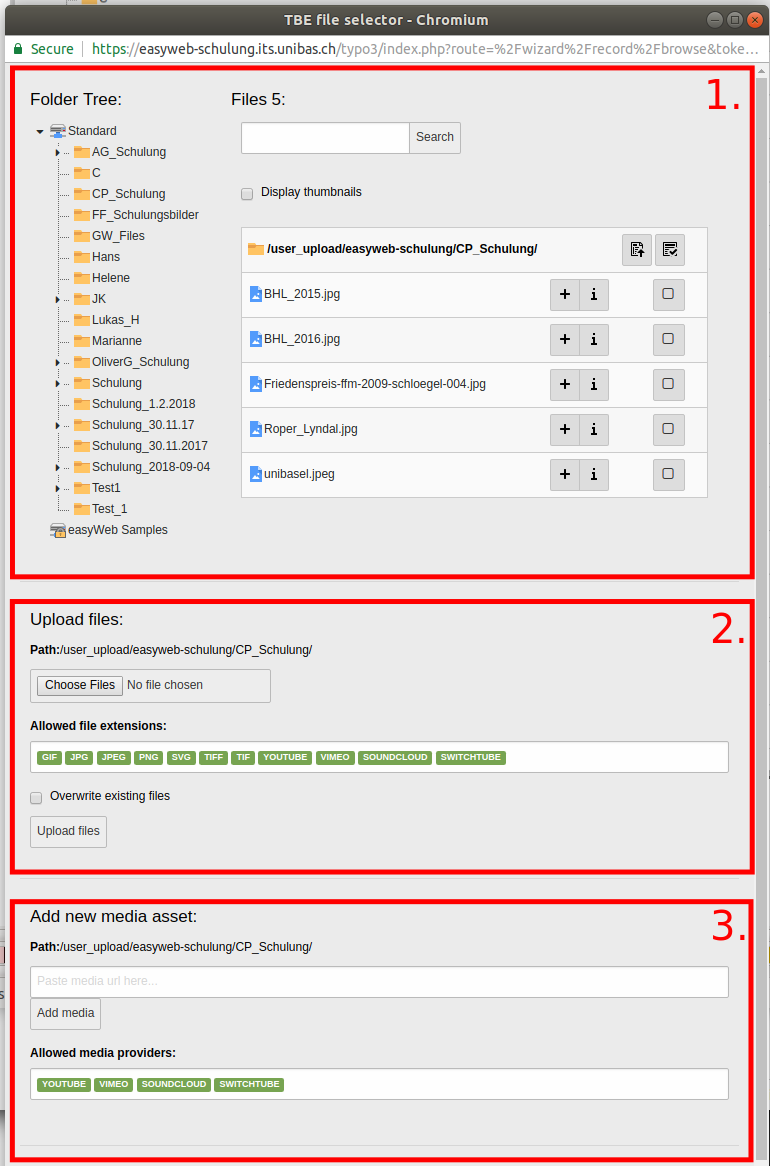
via "Add media file" button
To avoid having to switch to the "Filelist" module every time you want to upload a file, all modules that can reference media (Text&Media, Contact Box, Featured Image, Image Gallery, Slider, Teaser Box) have an "Add media file" button (see Figure 2). This opens the window as shown in Figure 3. The content of the window can be divided into 3 sections. In area 1, under "Folder Tree", select the appropriate folder for uploading. From area 2, either select the "Choose Files" button and then "Upload Files" or in area 3, paste a valid link in the text box and then click "Add media".
Now you have successfully uploaded the files to your easyWeb standard instance and can reference them.
Referencing
To add an existing file to an element, click on the "Add media file" button as shown in Figure 2. The window as shown in Figure 3 opens again. Under "Files" in area 1 all files of the current folder are listed (you may have to change the folder). If you want to insert only a single file, a click on the file name is sufficient. The selection window will close automatically and you should now see a new entry with your file on the page. To insert multiple files at once, click on the "+" button in the corresponding line for the file you want to insert. When you have inserted all the files you want, you still need to close the dialog box manually. After that you need to fill in the required fields for the metadata. Finally, click the "Save" button at the top of the page.


Replace

4: Replace File

5: "Keep current filename" checkbox
If you want to replace an existing file, you can click on the "Replace" icon. This is visible if the "Extended view" has been activated before. These steps are shown in Figure 4. To keep the filename, "Keep the current filename" must be selected, see Figure 5.
Now the file may have been cached by the browser. So in order to see the current version of this file, the browser cache must be cleared. How this can be done in your browser can be found in this tutorial.